
App Review: Disfluency Index Counter
Today's Tip Tuesday is featuring the Disfluency Index Counter App! I’ve used this app many times when working with children who have disfluent speech. I typically use it during evaluations, when monitoring progress, and in therapy sessions. This app allows you to perform a live count of the number of fluent or disfluent syllables. The graphics are very clear and the buttons are grouped nicely, which helps for quick access during conversations or speech samples.

This app allows you to identify the types of disfluenices produced by the child. You can categorize the disfluency by Block, Repetition, and Prolongation.
.PNG)
I also really appreciate the fact that the data is then calculated into both the percentage of stuttered syllables and the types of stuttered syllables. This is a real time saver! You also have the option to print or e-mail the results.
.PNG)
Improvements: I always like to have the ability to save my students’ data to show progress within an app. This app does offer one, but you are only able to record and access a students’ progress through an additional app called the “Therapy Report Center”, also by Smarty Ears. Though this appears to be a well-organized app that allows you to create an in-depth profile of your child, it’s just one more step I have to complete before accessing results (which can be time consuming if I am conducting an initial evaluation or screening).
Overall, this is a very helpful app that I like to use with my disfluent kids. I think that teachers and parents would have a difficult time using this app, because they would need to be knowledgeable about the different types of disfluencies in order to calculate an accurate fluency index. Right now, this app is priced at $8.99! Since this app does not have a lite version, you can check out a tutorial here http://www.youtube.com/watch?v=1JXfAhqLXbI.
What apps do you like to use with your students? Thanks for reading today's Tip Tuesday and App Reivew. Come on back next week for more!! Please follow me on Twitter and on my TeachersPayTeachers account for your most updated tips and FREE materials!


.PNG)
.PNG)

Monday, November 18, 2013
ASHA Do's and Don'ts!
Hey Guys!
Welcome to today's Tip Tuesday! I am so excited to share with you my first time ASHA experience in Chicago. I really had no idea what to expect or how to prepare for this journey, so I thought I'd share with you some tips I learned along the way!
1. Do plan ahead
Before I left for ASHA, I pre-planned my entire schedule, so that I could make sure to attend all the lectures I wanted and not scramble around the convention center getting lost. I used the Program Planner on the ASHA website. You can search for lectures and add them to your schedule! You can also download your schedule to your iPhone of iPad and it will automatically add events to your calendar. So helpful!!
2. Don't forget to share
Though I got to attend all my "must have" lectures, there were a few I regretted not attending (like the adult rehab lectures). The group of friends I went to ASHA with decided to split up for a few lectures. That way we could email each other notes and information from a missed lecture! Even though you won't get CEU's for this, it was still helpful for me to catch up on some adult dysphagia information that I desperately wanted!
3. Don't forget snacks
If you're like me and need to eat every few hours, make sure to bring snacks! The lines get overwhelmingly long during lunch hours and other breaks throughout the day. I made sure to pick up my morning coffee before the convention and brought a few granola bars. Also, allow yourself at least an hour lunch and dinner, because you will most likely stand in line for 30 minutes just to purchase a meal!
4. Don't be late
Arrive to the lectures early! I would try and get to a lecture at least 20 minutes early to make sure I got a seat. Others who arrived late or even on time were asked to leave due to space shortage!
5. Do allow extra space
Make room in your suitcase for extra goodies and freebies! I gathered a lot of free speech therapy items (my favorite being chewy tubes) and had a hard time packing. I actually had to check my bag for $25, because it was too full!!
6. Do bring your iPad
Make sure to bring an iPad or laptop computer. The lecturers do not provide handouts and you are expected to either print out the notes beforehand or view them on a portable device. I really liked using my iPad, because I could make notes right onto the lecture, email, and print them out! This was great when sharing lectures with my friends.
7. Don't forget your charges
If you do bring your iPad or iPhone, bring your charger too! You would be surprised how fast your battery runs out when your tweeting, emailing, texting, and writing notes!
8. Don't forget comfy clothes and shoes
I brought a mix of comfy clothes and dressy clothes for the conference. I ended up only wearing my comfy jeans and boots every day! Unless you're going to ASHA to network, get interviewed, or present, I would advise you to wear very comfortable clothes and shoes. You will be doing a lot of walking!
All in all, this was a fantastic experience and a fun way to get all of my CEU's! Chicago was amazing and I did get some time to enjoy the city, especially a lot of shopping on Michigan Avenue (oops)!
Did you go to ASHA? What are your tips? Leave a message below and come back for next week's Tip Tuesday!!

No comments:
Post a Comment
Organization: Lesson Planning and Freebie!
Hi Everyone,
Welcome back to Tip Tuesday! This is going to be a quick post on how I like to write up my lesson plans for each student every week. I don't know about you, but all of my kids are scheduled back to back and this leaves me very little time to prep for the next session. So, I have developed an organized system that requires very little planning before my next speech group. I thought I'd share it with you!
First off, I develop my lesson plans based on the theme of the week. Every week has a different theme and this week it's Halloween! This is the layout I use and it really helps me keep my activities organized by articulation, language, and books!

Everyone morning before I start treatment, I organize my student's folders and child-specifc therapy items into piles in descending order (first folder is my first student). I organized articulation cards, bubbles, and a haunted house box filled with my wh-question cards onto my student's folder.


The last 2-5 minutes of each session, I like to keep track of my data and also plan for the student's next session. In the beginning of the school year, and when working with new kiddos, I am still discovering their strengths and weaknesses. So, I like to make a note of what to work on for the following session ASAP so that I don't forget the specifics.
Below is a picture of the worksheet I created to organize my lessons for the following session. I keep a sheet in all of my students folders. That way my next therapy session is already planned out and all I need to do is grab the materials!


Welcome back to Tip Tuesday! This is going to be a quick post on how I like to write up my lesson plans for each student every week. I don't know about you, but all of my kids are scheduled back to back and this leaves me very little time to prep for the next session. So, I have developed an organized system that requires very little planning before my next speech group. I thought I'd share it with you!
First off, I develop my lesson plans based on the theme of the week. Every week has a different theme and this week it's Halloween! This is the layout I use and it really helps me keep my activities organized by articulation, language, and books!

Everyone morning before I start treatment, I organize my student's folders and child-specifc therapy items into piles in descending order (first folder is my first student). I organized articulation cards, bubbles, and a haunted house box filled with my wh-question cards onto my student's folder.

Below is a picture of what the folder look like with all the materials on top of their folder. That way, I don't even have to think about what materials to look for. I just grab their folders and go!

The last 2-5 minutes of each session, I like to keep track of my data and also plan for the student's next session. In the beginning of the school year, and when working with new kiddos, I am still discovering their strengths and weaknesses. So, I like to make a note of what to work on for the following session ASAP so that I don't forget the specifics.
Below is a picture of the worksheet I created to organize my lessons for the following session. I keep a sheet in all of my students folders. That way my next therapy session is already planned out and all I need to do is grab the materials!

How do you like to plan your lessons for therapy? Thanks for reading today's Tip Tuesday and please leave a comment below with your therapy planning ideas! Come back next Tuesday!!
Want your own lesson plan copy? Click HERE!
Happy Halloween!!

Tuesday, October 15, 2013
DIY Articulation Organizer
Hey everybody!
Today's Tip Tuesday is all about organizing your beloved articulation cards! I, like many SLP's, love using articulation playing cards (like the Super Duper cards) in therapy, because they can be so versatile! Over the years, I have made many custom artic cards (early developing sounds, CVC cards, etc.) for different children to meet their specific needs. As my collection continued to grow, I quickly realized that I needed an organizing system in order to keep track of which cards I had and which I needed. So, I came up with this!!

Below is what you will need:


Today's Tip Tuesday is all about organizing your beloved articulation cards! I, like many SLP's, love using articulation playing cards (like the Super Duper cards) in therapy, because they can be so versatile! Over the years, I have made many custom artic cards (early developing sounds, CVC cards, etc.) for different children to meet their specific needs. As my collection continued to grow, I quickly realized that I needed an organizing system in order to keep track of which cards I had and which I needed. So, I came up with this!!
Here is where I keep all of my "handmade" articulation cards. I color code them by position:
- Green- Initial
- Yellow- Medial
- Red- Final
- Blue- Blends

Below is what you will need:
- An old Swiffer box or any box (I personally like the clear lid)
- Snack size baggies
- Color Coding Labels
- Sharpie
- Articulation Cards

First, I print and laminate all of my articulation cards. A great site to get some free articulation cards is Adventures in Speech Pathology (one of my favorite Speech sites)! Next, I added the colored label on the right hand corner of the baggies and wrote the target phoneme on top. Below is an example of my /p/ cards in the initial, medial, and final positions.
To the side of the box (I couldn't get the picture to rotate the correct way-ugh!) there are more baggies with the blue stickers. Those hold my s-blends, r-blends, and l-blends cards!

I hope that was a good explanation of how I like to organize my articulation cards! How do you organize your articulation or language cards? Leave your answer in the comment section!
Thanks for tuning in to today's Tip Tuesday and please come back next week :)

Tuesday, October 1, 2013
Yard Sale Haul!
Hello everyone,
Happy October! I hope you are all having a wonderful fall! Today's Tip Tuesday is all about garage and yard sales! Shopping for your classroom or therapy room can be very pricey! I don't have the extra cash to spend on brand new toys, storage containers, or rugs/furniture. I am given a very strict budget from my district, and I'd rather spend that on testing materials, apps, or other speech therapy specific tools. So, I get my toys from local yard sales and swap shops. I thought I'd share my finds with you, so that if you go, you'll know what to look for!
The first few items below I use for storage. Yard sales are a great place to pick up some containers, boxes, baskets, and other storage items for your therapy room. I am constantly looking for convenient ways to store and categorize my items.

Above are plastic containers that came with a lid and handle. I used these daily when I traveled between schools last year and I loved them! I could easily store lessons, folders, files, or toys in one of these bins and be out the door! Now that I am based in one school, I use them to store my student's folders and other manipulatives.


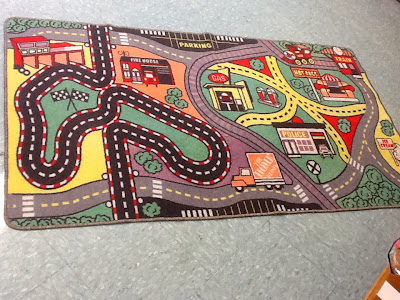
This was my all-time favorite find! It's a street map rug with all different stops (fire station, police station, ice-cream store, and even a Home Depot!). I got it for $5. I love using this with the kids to target following directions, spatial concepts, and vocabulary! FYI, I did wash this rug and clean all toys before bringing them into my therapy room. It's always a good precaution.
So, that concludes my yard sale haul! I got every item for under $5.
"One mans trash is another man's treasure!" What treasures have you found at a yard sale? Leave your answer or comments below :)
Thanks for reading and stay tuned for next week's Tip Tuesday!

Happy October! I hope you are all having a wonderful fall! Today's Tip Tuesday is all about garage and yard sales! Shopping for your classroom or therapy room can be very pricey! I don't have the extra cash to spend on brand new toys, storage containers, or rugs/furniture. I am given a very strict budget from my district, and I'd rather spend that on testing materials, apps, or other speech therapy specific tools. So, I get my toys from local yard sales and swap shops. I thought I'd share my finds with you, so that if you go, you'll know what to look for!
The first few items below I use for storage. Yard sales are a great place to pick up some containers, boxes, baskets, and other storage items for your therapy room. I am constantly looking for convenient ways to store and categorize my items.

Above are plastic containers that came with a lid and handle. I used these daily when I traveled between schools last year and I loved them! I could easily store lessons, folders, files, or toys in one of these bins and be out the door! Now that I am based in one school, I use them to store my student's folders and other manipulatives.

I found a few smaller baskets that were being sold for 50 cents and thought they would make a cute storage space for my wind-up toys and bubbles. I have 4-5 bottles of bubbles at a time, so keeping them all together is really useful!

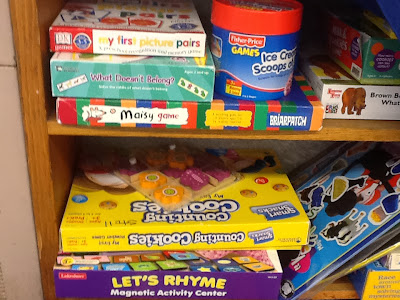
I very rarely buy a board game brand new, because there is always such a variety at yard sales. I can get a classic game like Sorry or Candyland for just 75 cents. Normally those games are around 10 or more dollars. Yes, sometimes the pons or dice are missing, but I have so many from other games, I just improvise with that. The kids don't notice or care!

I am a big collector of play people and characters. Sometimes, I can find sets, while other times, I can't. That's OK! My kids love digging through this box of goodies to pick out their favorite character. I literally use this box at least 2 times a day. Some of these characters, especially the Scooby Doo gang, are so motivating for my kiddos. They will do almost anything to earn a chance to play with them! I spent anywhere from 10-75 cents per character!


These both were fantastic good finds! I got the above box full of blocks for $2 and the farm for $1.50 and they are used almost every day in play therapy!

I rarely splurge on books. I find so many at yard sales or swap shops for such a good deal (like 5 for $2). Just make sure to check that no pages are missing!

This was my all-time favorite find! It's a street map rug with all different stops (fire station, police station, ice-cream store, and even a Home Depot!). I got it for $5. I love using this with the kids to target following directions, spatial concepts, and vocabulary! FYI, I did wash this rug and clean all toys before bringing them into my therapy room. It's always a good precaution.
So, that concludes my yard sale haul! I got every item for under $5.
"One mans trash is another man's treasure!" What treasures have you found at a yard sale? Leave your answer or comments below :)
Thanks for reading and stay tuned for next week's Tip Tuesday!

Hey All,
Today's Tip Tuesday is going to be all about Apps! Kindergarten.com offers a wide range of vocabulary flash card apps that are great for early elementary aged children! These apps focus on receptive language skills, word recognition, and cognitive development. The one that I am reviewing today is called the “Things You Eat” app. I use this with my students when targeting word retrieval goals, categorizing goals, and increasing vocabulary. This app is set up as a traditional flash card game: a picture is shown and you are expected to name the item.
The graphics are clear and authentic (not in a cartoon form) and distraction-free with a white background. The meal items that are depicted range from breakfast, lunch, snack, dinner, and dessert. There are also “stand alone” pictures of vegetables, fruits, and dairy products.

I really like that this app includes a built-in reward system! After five attempts, the player is rewarded with a musical break. The break lasts about 10 seconds long.

When you go into settings, you have the ability to shuffle the cards, turn on/off voice audio and the chime sound, or turn on/off the music reinforcement.

I also really appreciate the fact that Kindergarten.com has a diverse selection of flash cards (sports, vehicles, alphabet, music, clothing, toys, and actions).

Improvements: This app is ideal for younger children who are not able to read yet. However, I do have a few children on the spectrum who have started reading at age 4! So, when using this app with them, they are able to read the words instead of identifying the pictures. Having the ability to turn on/off the words would be a great addition to this app! Also, I would love to have the opportunity to monitor and save my students’ progress within this app, so that I can distinguish between incorrect and correct vocabulary items.
Overall, I think this is an easy and quick tool to use when targeting vocabulary with younger elementary school aged kiddos! I also think that this app is very user friendly and would be an excellent carryover activity for parents or teachers in the classroom or home! This app is currently free (another great feature), so check it out!

Think Outside the Box!
Hey guys!
Today's Tip Tuesday is going to cover something that is probably a no brainer for any school-based SLP! Tissue and shoeboxes are a must have in my therapy! These are my go-to therapy items when I'm conducting articulation drills. Not only does it provide immediate positive reinforcement, but it's also very cheap! Family and teachers know that I am a huge collector of these so called "trash" items. Here are some examples of how I transform my old shoe and tissue boxes into fun animals for treatment!

Some materials that you may need to purchase in order to complete this project include paint, a hot glue gun, styrofoam, and googley eyes!

There are also tons of tissue printables online. I found this printable Old Lady from the story "There Was An Old Lady Who Swallowed a Fly" on Making Learning Fun. The kids love feeding the Old Lady!

I have to admit, there are times during the school year when I am just too lazy busy to make another animal box from scratch. So, I found some of these cute pre-made animal tissue boxes at Target for $1.99! There are tons of different animals to choose from. When I tested these out with my pre-schoolers, they really enjoyed "feeding" them their articulation cards. One girl even had her mother go out and buy some to use at home when practicing her sounds (great motivation for generalization)!

I found some other great examples of animals and critters made out of boxes on my beloved Pinterest.


If you want to get creative and really "think outside the box", shoe and tissue boxes can make excellent additions to your play area too. Instruments, stoves, houses, and garages are excellent toys to use during play therapy when working with the little guys!


The possibilities are endless and I can't wait to try some of these out myself! How do you use tissue and shoeboxes in your therapy?
Thanks for reading today's post and please stayed tuned for more tips next Tuesday :)